Showing posts with label christmas. Show all posts

Saturday, January 14, 2017

Winter Penguin Window Greeting Cards

Posted by Amanda at Saturday, January 14, 2017 0 comments
I love the window cards that I see every where and I love shaker cards so I combined the two in this card. I challenged myself to make several cards with these penguin stickers that I got at Hobby Lobby. I wanted to do something simple, and I don't have any of those special window dies so I decided to use what I had on hand. During the process of making this card I realized I had no acetate for the windows so I did as I have done before and used Project Life Photo Pockets - I get them at Walmart.I love the texture of the cut out cross stitched square left from the windows so I used distress ink to color them and used them as the background for the window; I decided I needed a little more color, but didn't have any blue card stock so with the help of the wonderful card makers out there on Youtube I just used my Tim Holtz ink and did a border of color to matched, added Cartwright sequins, and some beads from my stash. I stamped the "Merry Christmas" with Versafine onyx black and that's it! To finish it off, I added a penguin inside.

- Vicki


Saturday, January 7, 2017

Christmas Elves Holiday Greeting Card

Posted by Amanda at Saturday, January 07, 2017 0 comments
Happy Saturday!

I love these elves! They are Buddy and Jolly from Stamping Bella. These were colored with pencils and I added some glitter paper with some Christmas card stock from my stash. They came together pretty fast so I made a few of them. I think they are just so cute!


Inside the card

Sunday, January 1, 2017

Gingerbread House Holiday Card

Posted by Amanda at Sunday, January 01, 2017 0 comments
Happy Holidays! I have 3 holiday cards lined up to help carry over some Christmas cheer into January.

For this card, I got the Lawn Fawn Sweet Holiday stamps and dies last Christmas but never had a chance to use them. It was pretty simple to make! I used the Lawn Fawn stitched hills, some Kraft card stock for the house and gingerbread, and white card stock for the candy. I colored the candy with pencils and added some glossy accents. Then I backed it with some pink Christmas paper and, as usual, added strips of the left over paper to finish off the inside.


Wednesday, July 22, 2015

Christmas in July - Holiday Window Paper Card

Posted by Vicki at Wednesday, July 22, 2015 0 comments
Hello! Long time no post. I've been pretty busy lately, but I recently went on vacation for a week and had the chance to do some extra crafting, and get some posts ready - so look out for more updates soon!

I have seen so many wonderful tutorials on Youtube using this window die cut, so I thought I would give it a try - of course I had to add a cat! I really enjoyed making these and I can't wait to hand them out in a few months.

Resources:
Small Window - Poppy Stamps
Cat - iostamps
Martha Stewart punches (branch & present)
Tim Holtz distress ink

I also used Spellbinders Celebrations by Richard Garay for the pierced rectangles - they were the only pierced dies I could really afford, so I have been using them a lot lately!


 The inside I kept simple with some glitter embossing.

Friday, September 26, 2014

Recycled Christmas Wrapping Paper Cards

Posted by Vicki at Friday, September 26, 2014 0 comments


Here is my first Christmas project of the year! These tags and cards were made from clearance wrapping paper and recycled Christmas cards, a few stamps I had, and some plastic snowflakes I bought years ago. I love taking wrapping paper and cards, cutting them apart, and making something new.

The snowman was cut from wrapping paper several times and layered on the tag with foam dots. I love the sheet music card and vintage tree, I got these sometime ago out of the Michaels bargain bin. I hope these get some ideas flowing for the Holidays to re-use and recycle!


The Inside


Some of the supplies used


Saturday, December 21, 2013

12 Days of Christmas DIY Greeting Card

Posted by Vicki at Saturday, December 21, 2013 0 comments
Here is part 2 of my Graphics 45 Christmas card set! This one is themed with their '12 Days Of Christmas' paper that is new this year. I made this card similarly to the last one, so refer to that post for credits.


With this card I also used Martha Stewart punches to create the fence and leaf stems. The door comes from Poppystamps, which is such a great resource.


This card also included a lot of fussy cutting which I love to do. Can't wait to give this to someone!


Wednesday, December 18, 2013

The Nutcracker DIY Christmas Card

Posted by Vicki at Wednesday, December 18, 2013 0 comments
 

I have been making a ton of Holiday cards this year! Here is one of my newest, using some of my favorite papers from Graphics 45, their Nutcracker Suite series from last year. I have to thank Xannero1 for her wonderful creativity. I love her work and the structure of her cards.

My first card in this style was 'Secret Garden' themed (post coming soon!), so I decided to make some Christmas ones with the festive paper I had. I also used a lot of Glossy Accents to make 3-Dimensional aspects and it also works as a great glue!


In the back I included a pocket to stick a handmade note or other card elements. I tied it all together with some cute Christmas ribbon. Here's a look at the 3D up close!


Sunday, December 15, 2013

Nightmare Before Christmas Disney Paper Craft Christmas Ornaments

Posted by Vicki at Sunday, December 15, 2013 0 comments
 
 
One of my daughter's favorite Christmas movies is 'The Nightmare Before Christmas' - even one of our bathrooms is decorated with Jack Skellington! I got the idea for these guys coming out of Halloween crafting since I had some spooky black and white scrapbook paper still hanging around. I had also been seeing a few Jack ornaments popping up on Pinterest, so I decided to make my own!

I got the black snowflakes and tinsel last year on clearance and used them behind Jack to give some sparkle (I believe everything could have more glitter). I used my Sizzix circle die to make Jack's face out of foam and drew on his features with Sharpie. The decorative paper behind him is scrapbook paper - including some very pretty handmade paper I found on clearance a while ago at JoAnne's - and used tacky glue and hot glue to put it all together. The alternative version simply has two snowflakes overlapping each other.


Move over Halloween, its Christmas time!

Sunday, May 13, 2012

Thinking of Christmas in July

Posted by Vicki at Sunday, May 13, 2012 0 comments
I was going through of some of my older hand-made ornaments, starting to think about "Christmas in July" as all of us do! Here are three of my favorites, made with clothespins. These were made probably more than 20 years ago - they're due for a revamp! I'll post the updated versions when I'm done; but I thought everyone might enjoy seeing some 'retro crafts'. They were some of my favorites to make.


A little 80's flashback - nice shoulder pads! Hehe. 


I think we can leave the snowman as is; maybe update his hat. We'll see.

Saturday, April 28, 2012

Cute (and thrifty!) Handmade Christmas Cards

Posted by Vicki at Saturday, April 28, 2012 0 comments
I wanted to start off by showing off some of the cards and an ornament I made with the clearance I found right after Christmas; that is a great time to get great buys on holiday paper and supplies for the next year.


Here is a shot of everything I used. I hope it will feed your imagination like all of you wonderful crafters do for me.


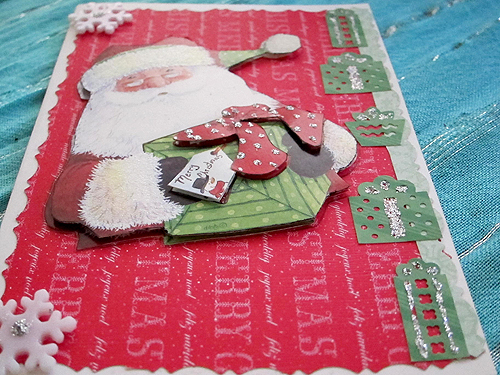
The snowmen on all the cards are all from wrapping paper that I cut out several times and overlayed them to give them demension using foam tape. I ran all the pieces through the Xyron (my newest toy that I love!)  and backed evey piece on cardstock. The Xyron machine makes everything into an instant sticker - very cool! The trees in front and behind the snowmen are from clearanced Christmas cards - I just loved the way they looked, but the cards themselves were kind of plain so I backed them on card stock and added them to the card with foam tape. 


The backgroud is some Martha Stewart Christmas paper I got on sale at Micheals previously, and then some odds and ends from one of my many craft drawers. The glittered snowflakes and the plastic ones came from my local dollar store (but I never spend just a dollar there! hah), and the Merry Christmas' are from cardstock cut with design scissors and stamps I got from the dollor bin at Micheals and JoAnns a long time ago, but I just knew for the price they might come in handy someday. The Santa card was done the same way: cut out several images from the Christmas card and layer it for dimension.


Well here is my first post! I gave these out at work and they were definitely a hit. I hope it gave you an idea or two :) If you have any questions, go ahead and leave me a comment. Thanks for reading!
 

Jubilee Crafts Template by Ipietoon Blogger Template | Gift Idea